This week
- Worked on moving my module to CaseHPC
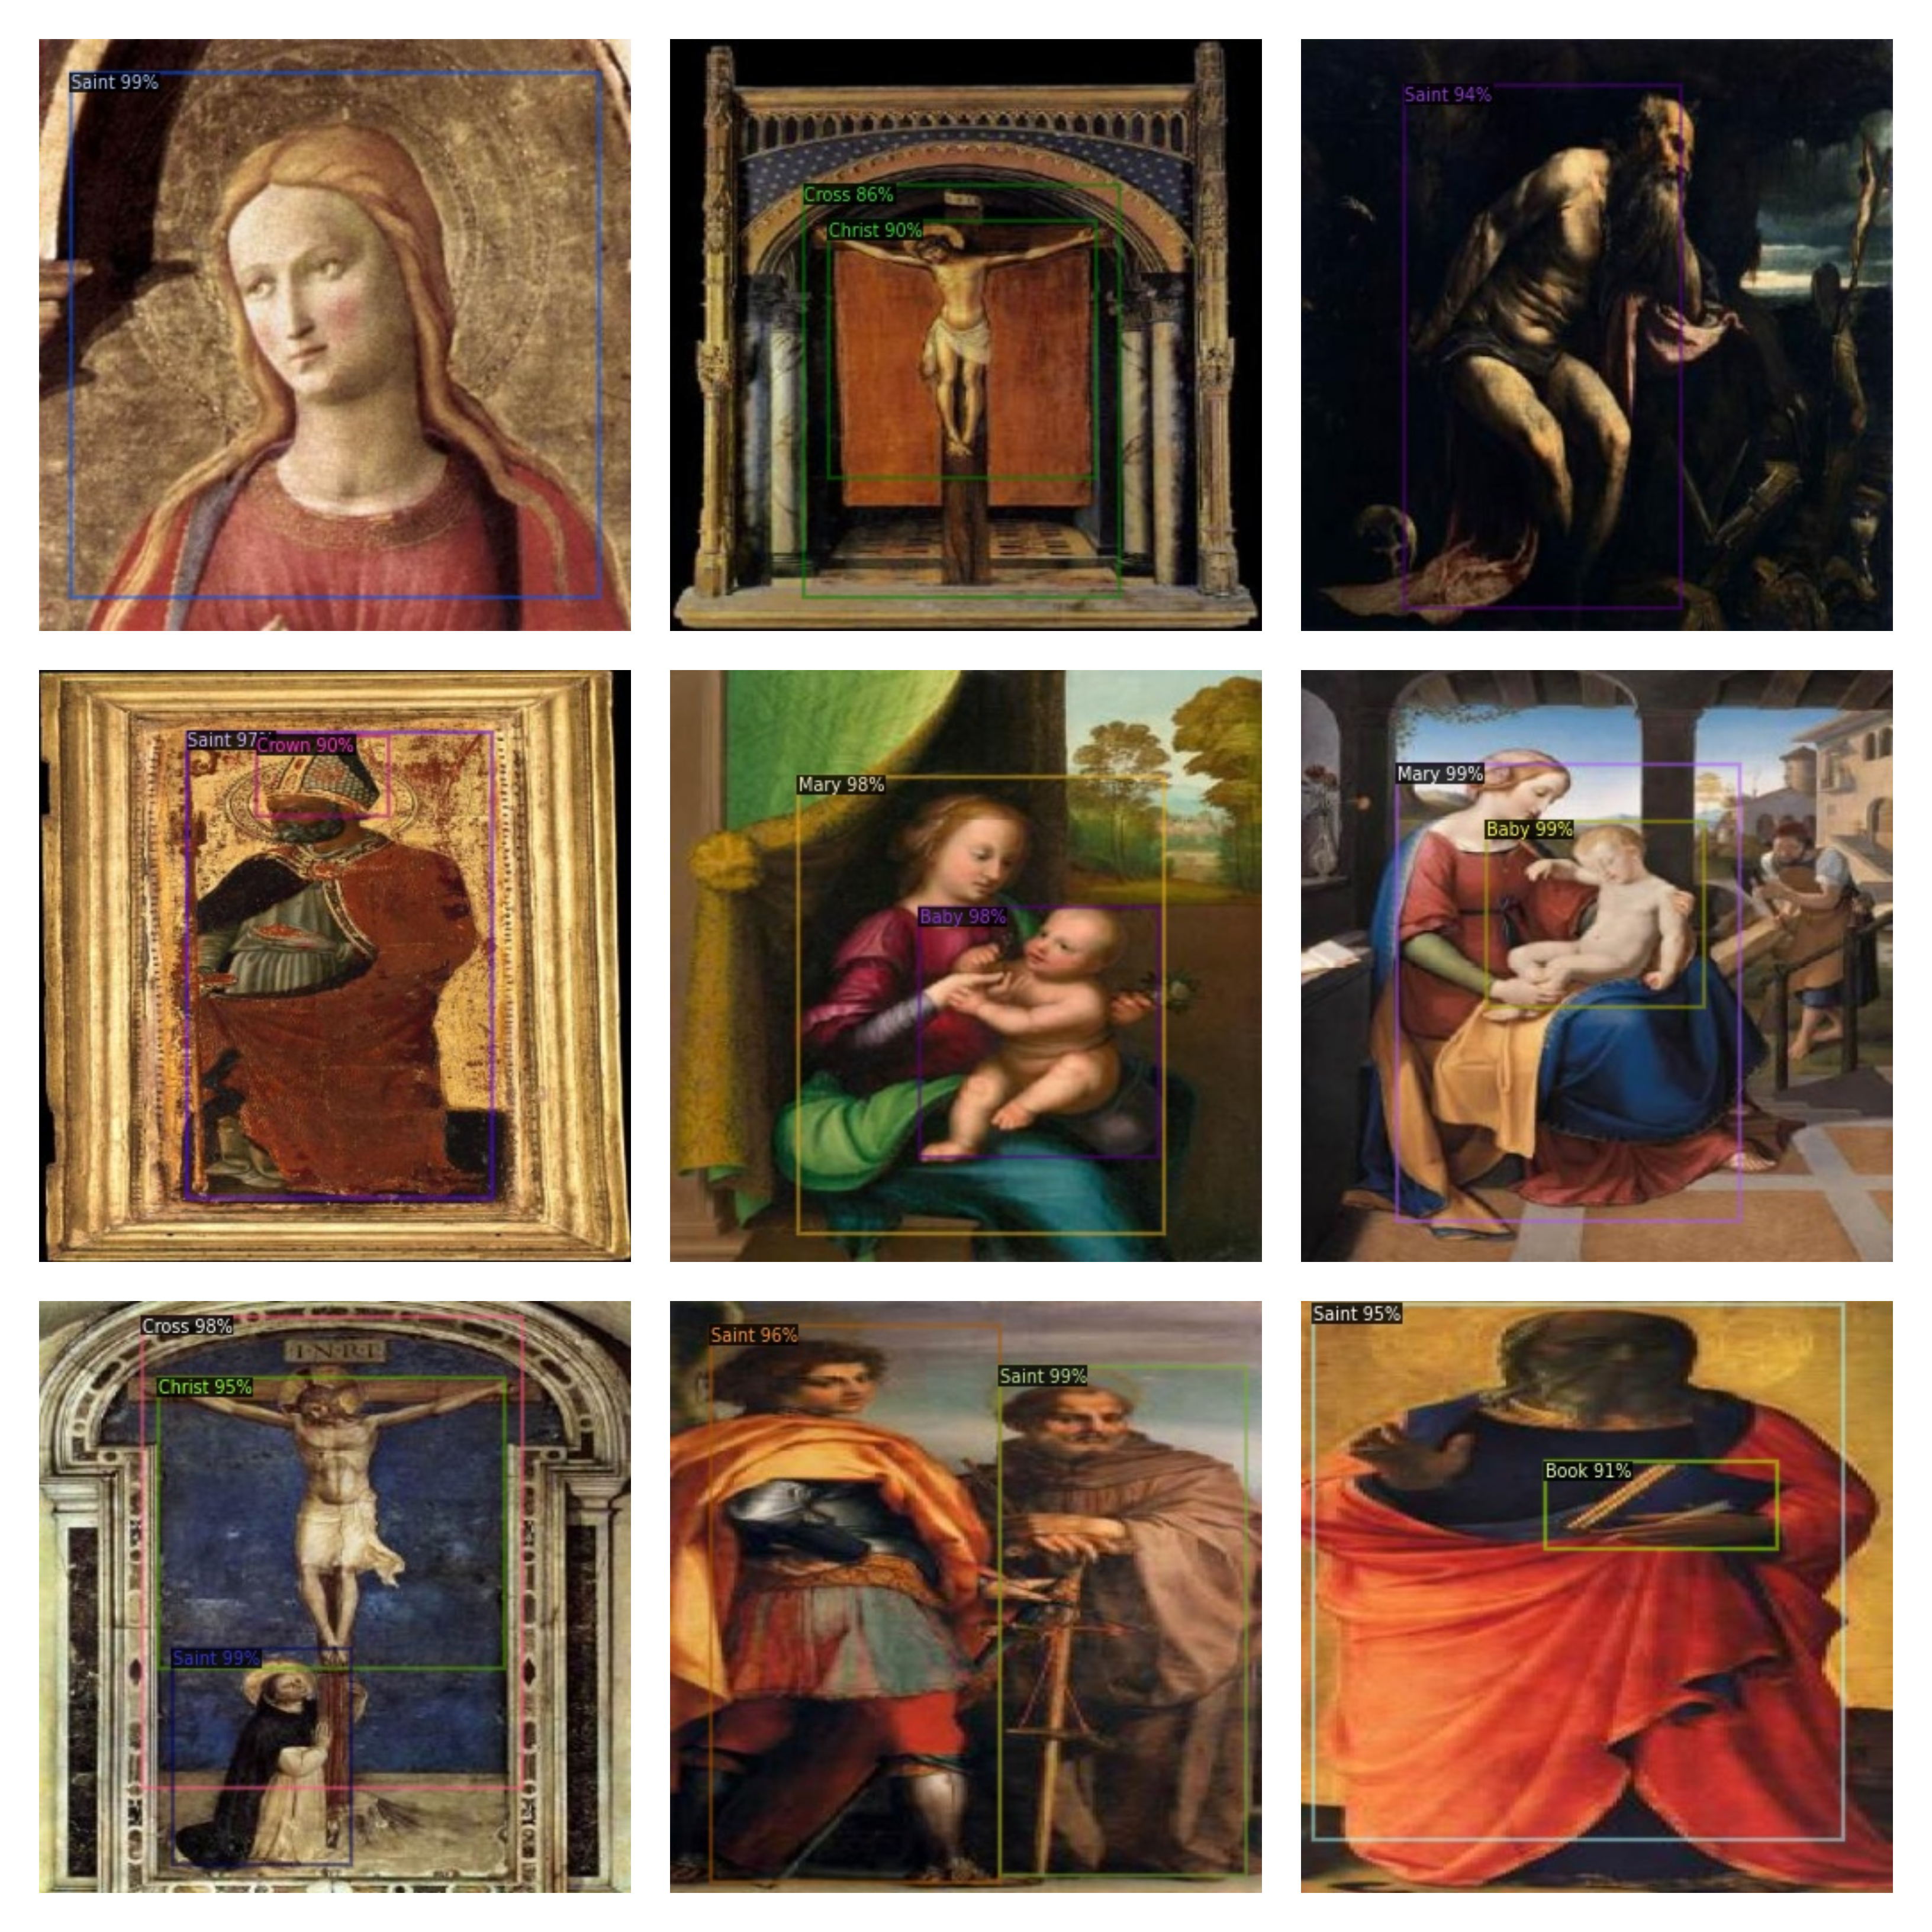
- Tried perfecting F-RCNN for detecting saints and their attributes in paintings.
Regarding CaseHPC
One of the things I couldn’t do in the first phase of this program was to use Case Western’s HPC to train my models in general. So this week I decided to get my hands dirty and made my module work on one of the gpu nodes of Case HPC
How do we do this?
After circulating back and forth through Techne and Case HPC’s documentation. I understood how to run my module on GPU. In order to make this easier for other participants in the future. I will explain the procedure for this in this blog.
1. Creating Singularity Containers.
This is sort of the main ingredient if you don’t have this then you can’t access those gpu nodes essentially.
But why use containers?
This is an interesting question right. I think the answer is to solve ‘it works on my computer though’ problem. With this you import your whole environment such that it can work anywhere. For instance run python --version once you login to Case HPC. (Spoiler Alert: It is 2.7)
Now we can’t run all those pytorch/tensorflow models in 2.7 right. This is where containers come in.
How to create one?
Now I am creating my containers from docker and then converting them to singularity so my solution will be exclusively based on that.
1. Create a Dockerfile.
Wherever your work is create a dockerfile which contains mostly things you might want in your container like python packages etc or some directories.
Here is an example.
FROM python
COPY YOLOv6 ./YOLOv6
RUN apt-get update && apt-get -y install gcc
RUN apt-get -y install libgl1
RUN pip install --upgrade pip setuptools wheel
RUN pip3 install -r YOLOv6/requirements.txt
WORKDIR "YOLOv6"
2. Next build the docker image.
sudo docker build -t object-detector-yolov6 --progress=plain -f Dockerfile .
3. Pushing to docker hub.
If you haven’t logged in first login using docker login then push the image using docker push username/image-name
4. Next convert the image to .sif
singularity pull docker://username/image_name
That’s it. Note that we can also do this locally as long as we have the docker image. But since I was working on Case HPC i decided to push it to docker hub so that I could pull it from that environment.
2. Using GPU nodes on CaseHPC
Assuming that the login steps have been (If not view how-to here) completed.
1. Go to the gallina home
cd \mnt\rds\redhen\gallina\home\abc123
2. Requesting a GPU node.
Case Western provides access to certain gpu nodes for processing. If you want to access one. Try running si first to see which ones are available
After that we use this command to finetune our requests for gpu. (Run srun help to learn more)
srun -p gpu -C gpu2v100 --nodelist=gpu059t --gres=gpu:1 --mem=50gb --pty bash
Let’s understand the params. If we ever want to access a node with gpu then it is important to include gpu param including the gpu we want using si. Next we can request a specific node again by checking which nodes are unallocated from the previous command. The memory param is basically for the amount of memory we want in our job and finally the bash lets us enter our gpu node is what I think. This is all I could understood after reading through the documentation and some powerpoints on Case HPC.
2. Syncing files.
After we gain access to this node. We now have to sync our files from gallina to here. For this we use rsync.
rsync -az hpc3:/mnt/rds/redhen/gallina/home/rpm93/RedHenLab_Multimodal_Christian_Art_Tagging/ /tmp/$USER/
This step does it for us.
3. Using the GPU
Now that everything is done we just have to access the GPU. This is where singularity. Assuming that the singularity container has been pulled. We will see how to use it.
In order to run a container we normally require commands like run or exec. So I will show here how to run a python script in singularity
singularity run --nv art-detector-yolov6_latest.sif python tools/train.py --batch 32 --conf configs/yolov6s.py --data Iconart/data.yaml --device 0 --workers 0
Let’s understand what happens here. The –nv is essentially to make sure that we can use GPU in the container and .sif is the image name. Finally we have the command we want to execute in the container.
Note: Singularity requires directories to be binded if we are running from another location that is not home. So just include –bind in that case.
3. [Bonus] Using scripts
We can always run commands one by one but why not do it all in one place when it is very easy to do so.
For instance this is the simple script I wrote for training my YOLOv6 model
#!/bin/bash
rsync -az hpc3:/mnt/rds/redhen/gallina/home/rpm93/RedHenLab_Multimodal_Christian_Art_Tagging/ /tmp/$USER/
cd rpm93/modules/object-detection/YOLOv6
module load singularity/3.8.1
singularity pull docker://lazycodes7/art-detector-yolov6:latest
singularity run --nv art-detector-yolov6_latest.sif python tools/train.py --batch 32 --conf configs/yolov6s.py --data Iconart/data.yaml --device 0 --workers 0
And I can run this by just doing bash run_module.sh
This completes our YOLOv6 module. Of course we can make this script more interactive later but this is just an idea.
Using F-RCNN
During our final meeting before phase-1 ended. I had showcased my YOLOv6 model that worked fine to detect the saints in paintings. One of the problems with YOLOv6 is that it is a single-shot detector so while it is fast it might not be the most accurate and hence I wanted to try out Faster-RCNN again to see if I could do something with it to improve my performance.
What was new this time
One of the problems was that well-defined implementations of Faster-RCNN were scarce and so the model I built last time was bare-bones with no way to understand the metrics of the model’s performance. Even the detector wasn’t good enough for the problem I was solving. Since I had more time now, I decided to switch to Facebook Research’s detectron2 that hosts implementation of various object-detection models.
Using detectron2, I converted my dataset to COCO format and then trained the model for 1500 iterations. I used the same labels as in YOLO. Here are some of the good results.
Next Week
- Read the book written by Emile Male recommended by Professor Mark Turner
- Identifying more attributes related to the saints.